Since Windows 10, the focus of Microsoft has been removing Control Panel and making all the settings available in the Settings app on Windows. They are slowly adding features and settings from the Control Panel to the Settings app, so that users use the Settings app more instead of the Control Panel. However, Control Panel isn’t of no use as of now, and there are various settings that you can tweak from the Control Panel.
How To Activate Windows 11 God Mode
If you are looking forward to enabling God Mode in Windows 11 and access all the settings from within a single folder, then this article will help you with that. In this article, we will be discussing how you can enable God Mode in Windows 11.
1 How To Activate Windows 11 God Mode2 How To Enable God Mode In Windows 113 Use God Mode In Windows 114 Disable God Mode In Windows 115 Final Words
How To Enable God Mode In Windows 11
You can easily create God Mode by making a new folder. However, before you continue, ensure that you are signed in with an administrator account. To enable God Mode in Windows 11, follow the steps given below-
Right-click on the desktop to open the context menu. In the context menu, click on New, and then on the new menu that appears, click on Folder. This will now create a new folder on the desktop.
You will now have to rename the folder. To rename the folder, select it, right-click on it, and then click on Rename. Now paste the following name to the folder GodMode.{ED7BA470-8E54-465E-825C-99712043E01C} and hit Enter to rename the folder to it.
Now refresh the PC by pressing F5 or by right-clicking on the desktop and then click on Refresh from the context menu.After you refresh the PC, you will see that the folder has been replaced with the Control Panel icon with its name as God Mode.
This will enable the God Mode or the Windows Master Control Panel on Windows 11.
Use God Mode In Windows 11
Just like enabling, using God Mode is also quite easy. Double-click on the God Mode icon to open it. You will now see more than 200 settings that are arranged in 33 different categories.
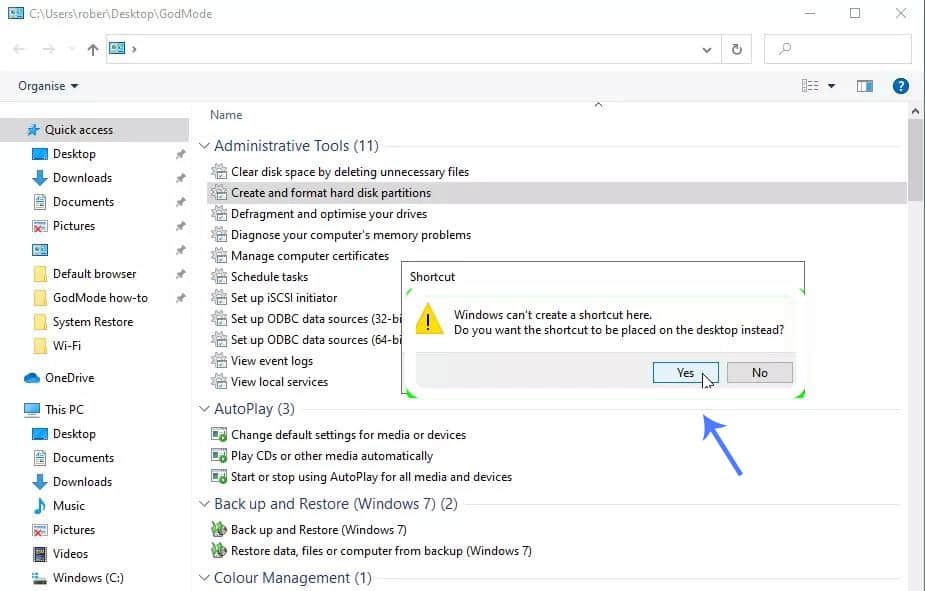
To use a setting in the God Mode, right-click on the setting, and then click on Open to use that setting. Opening the setting will open the particular app window so you can make the changes.You can also search for the settings in the search bar and use it. When you search for a particular setting, you will get that setting along with all the related settings to help you with what you are looking for. You can also create a shortcut of the settings from here. To do that, right-click on the setting that you access frequently. Now click on Create Shortcut option from the menu that opens up. You will get a prompt saying ‘Windows can’t create a shortcut here. Do you want the shortcut to be placed on the desktop instead?’ Click on Yes and the shortcut will be placed on the desktop.
Moreover, from the context menu, you can change the view of the settings, changing the sorting type, and also group them. You can group them based on alphabets, keywords, application, name, and various such. To do so, right-click anywhere in the God Mode, and this will open up the Context Menu. You can now access these settings from here.
Disable God Mode In Windows 11
You can easily disable God Mode in Windows 11 by just deleting the folder you created. Select the folder, and press the Delete button on your keyboard to delete it. If you want to permanently delete it, then press the Shift + Delete key combo and the God Mode will be deleted.
RELATED GUIDES:
How To Enable Windows 11 Dark ModeHow To Turn Off S Mode on Windows 11How to Start Windows 11 in Safe Mode
Final Words
This is how you can disable enable and disable God Mode in Windows 11. If you want to have full access to the settings of the Control Panel, then you can prefer turning on the God Mode. We have discussed how you can turn on and use the God Mode in Windows 11. Following the above steps, you will be able to enable, use and disable God Mode in Windows 11.
Δ


